Showing posts with label Review. Show all posts

Saturday, January 5, 2019

Review; Silca Borsa Americano Phone Wallet

I picked up a Silca Borsa Americano last Spring in the ever-ongoing quest for looking for the perfect phone wallet.

I had been using a Waterfield case for a year or so which was great as it allowed me to also carry a Wahoo Dongle on my phone. When TrainerRoad started allowing outdoor rides to sync without capturing it on the App on my phone I started to look for a smaller option, the Waterfield case was a bit bulky.

I was already a fan of Silca products, I picked up their T-Rachet and TI-Torque kit on a Kickstarter in August 2017 and since then have slowly been adding their tools and accessories to my kit arsenal. When they had a sale on their Expo gear I jumped in and grabbed a Borsa Americano Phone Wallet.

Items like this are, in my mind, like golf putters, their design and look either appeals to you or doesn’t. I was attracted by the fact this this is made from upcycled inner tubes, this makes good use of something that is usually destined for the trash and it also makes each Wallet unique. The construction is actually made from three layers, the outer (inner) tube, a middle layer of upcycled neoprene from discarded wetsuits and the inner; a robust cordura liner is sewn in. As with all Silca products they don’t skimp, and the wallet is finished with contrasting stitching and a YKK zipper. You can read more here about the Origin Story of the wallet.
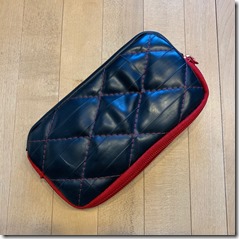
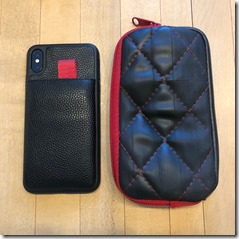
clip_image001clip_image001[4]clip_image001[6]

As there has been no improvement in my eyesight I am still using a large phone. Since my earlier review I have upgraded my iPhone 7+ to a XS Max. My phone case is actually a “wallet” and holds two credit cards and my Driver’s License, this fits with no issue. The phone dimensions are almost identical 157.50 x 77.40 x 7.70 for the XS vs 158.20 x 77.90 x 7.30 for the 7+ so as expected, and proved out, there are no issues.

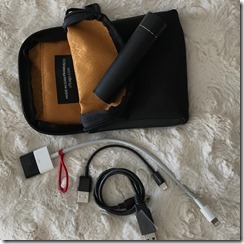
Inside there are four pockets of different sizes, perfect for credit card, cash or keys. Silca presents the Wallet on their website with a myriad of contents. While I think technically you can fit these all in I am not sure how “comfortable” it would be? All I see when I look at this photo is a scratched phone! Which somewhat defeats the object. Personally, I tend to keep soft items in the case; phone, cash, cards, SIS tabs, sachets of sunscreen, Chapstick etc. Anything hard and scratchy; tools, levers and C02 lives in my seat bag.

image

The bag fits snugly into my Pactimo jersey pocket and in addition to keeping this safe it stops the phone from bouncing out, something that has happened in the past. Yes, I have ejected my phone while riding!

In terms of its waterproofness I can’t say I have tested it in the rain. But I have tested in the heat. Having something rubber (butyl) close to your skin for any length of time you would think this would cause a hot spot but that hasn’t happened either. There is some evidence of warmth as you can see I have sweated through to it but it’s not anything I have noticed or has caused issues.
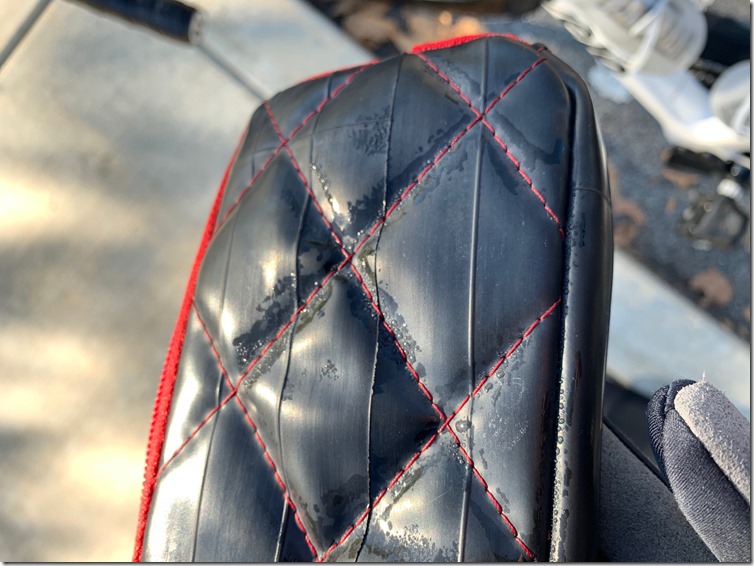
clip_image001[9]A bit sweaty post 4 hour ride under a winter jacket, it was warming up during the day!

So overall the Wallet does exactly what it says on the tin. It looks after your phone and valuables and does so in a stylish and unique way. It’s a bonus that it also keeps stuff out of the landfill!

Available through the Silca website, you can also find it on Amazon and comes with free shipping if you have Prime!

The Borsa Americao was purchased by me. See previous gear reviews in the tab above. If you have a product you’d like reviewed, contact me at quadrathon@gmail.com.

Sunday, April 23, 2017

Review; Waterfield Club Cycling Pouch

Failing eyesight and the need for reading glasses was the primary driver for upgrading my iPhone at the tail end of last year. I moved from a 6 to a 7+. Of course, the bigger font came with a bigger screen, this meant there was a need for a bigger pockets on my cycling jerseys. Or at least more room being taken up in my pocket by my phone. The problem was further exacerbated by my desire to ride with a Wahoo dongle to capture my outdoor rides within TrainerRoad. The end result was a phone and cable sticking out of the pocket. Not want to have a $1000 phone eject out of my pocket on the road or trail I spent some time looking for an option for keeping it safe and secure. I came across a few possible options that had no problem housing the phone but the cables were always the problem. The cases were just not long enough to allow for the cables poking out the bottom, the opening was on the side and wouldn’t accommodate the phone and cable or they were just plain expensive, upwards or $100 for some.

Some weeks into my search I came across WaterField designs. They offered the Club Cycling Pouch which had the unicorn of phone pouches, a closure at the end rather than the side. According to their website it was large enough to hold the phone, a CO2 cartridge, multi-tool, credit card, cash and key. They offer two versions; the Black Ballistic and the Brown Canvas, I opted for the Black version as it was a bit less conspicuous. I placed my order and a few day later it turned up. It only had to come from San Francisco so by distance standards it was local

I was really impressed with the overall build quality of the Club Pouch. It’s very well made and has some very nice features;

  • The zip closure has a self-sealing water proof barrier
  • There is a separated phone sleeve within the pouch that is lined with soft material to not scratch your phone’s screen
  • It’s lined and the fabric has a great look and feel
  • The ballistic nylon exterior seems to be very resilient
  • It’s made in America and it looks gosh darn nice!
  • I have ridden with it several times now, including Strada Rosso, and I have to say so far so good.

It slips easily into a jersey pocket. It’s actually a perfect fit so it’s not sloping about. It does poke out some but unless you have super deep pockets that’s going to happen.

I have a saddle bag on my bike and so I don’t have any need for the items that WaterField suggests you carry. I have opted for the Professor Gadget version and carry an Anker Lipstick charger for my Phone and Garmin as well as cables to support that. I have cash in there too.

It doesn’t quite do what I need it to do. I am unable to zip it closed with the extra cable but I can get the zip far enough around so that everything is secure in the pouch. No doubt without my additional cables the zip would close without issue. That said this would something to consider if you are wanted to charge your phone and ride as the charging cable has some section that sticks out.

I decided to not remove my phone case while using it. I do stop and take photos and protecting your phone while riding only to drop it on the side of the road would be maddening to say the least. My phone case is not huge but it is a snug fit in the specifically lined section. I just use the other section without any issues.

So overall this is definitely one of the better cases out there. Protection and access are often counter point to each other and the Club Cycling Pouch  does a good job of balancing the two. In an ideal world, for me, it would be a quarter inch wider and a half inch longer but my use case is pretty specific so for most people I think this is a great option.

I purchased the Pouch directly from their website. It’s priced at $49 so it’s not cheap but as a percentage of a cost of replacement phone it is, in my mind, good value for money!

IMG_2755IMG_2757IMG_2758IMG_2760IMG_2761IMG_2759

The Club Cycling Pouch was purchased by me. See previous gear reviews in the tab above. If you have a product you’d like reviewed, contact me at quadrathon@gmail.com.

Thursday, February 2, 2017

Review; Clement X’Plor USH

As mentioned in my BWR Survival Camp post I took the opportunity to try Clement’s X’Plor USH tire. The USH comes in one size 700x35, this is a beefy tire for the road.

Often tire choice is a bit like choosing a golf club. You look at the pictures, read the reviews and in the end kinda go with the one that captures your eye and wins your heart. For the gravel rides last year and more recently for CX Racing I have used, with good success, Clement tires; specifically, their X’Plor MSO and MXP tires respectively.

20170125_055714000_iOS

Going into the camp I knew that there would be a more riding on the road compared to some of the other gravel races I ridden from last year (Dirty Kanza200, Rock Cobbler, and RSR) and as such I had three wheelsets shod with Clement tires. My first choice was going to be the USH wheelset. Self-described as the tire for mixed conditions. I was looking for a tire that would provide minimal rolling resistance on the road but that also had some bite when it came to riding in the dirt these seemed like a good choice. I had on standby the trusty MSO which did me proud at DK and Stan’s Grail wheelset with Tubeless MXP which I had been using for CX racing. I am new to tubeless and was a bit wary of them, having an issue could result in me being covered in sealant and left on the side of the road. So my plan was to try the USH wheelset on day one and then, based on my experience, decide what to use for the following two days.

The tires were mounted on my standard Shimano CX-31 disc wheelset. Not the lightest or sexist wheelset in the world they have handled everything I have thrown at them. The tires are clinchers and inside I had Bontrager Self Sealing tubes. Nothing fancy but solid. Front and rear was inflated to 75psi. This would be plenty hard for the off road section but a crap shoot when it came to the road. I was carrying my trusty Lezyne pump so if I needed a little more air I was self sufficient. I choose the 120tpi version vs. the 60tpi for better cornering and a smoother ride.

The first ride out contained only a minimal amount of dirt and the road climb up Double Peak. The tires provided plenty of grip on the dirt climbs and I was able to stand up without the nerve and back wrenching rear tire slip that can happen. They rolled easily over the small rocky section of trails that were wet. The only place where they really slipped was in a sharp descent down a greasy grassy bank. No surprises there as this is not the targeted surface. On the road they rolled comfortable and didn’t have the rumble that you would associate with a CX or more heavily treaded tire. Both up and down Double Peak was not a problem as was bumping up and down the required curbs and steps transitioning from the road to sidewalk and parking lot etc.

BWRSC-3-25

Photo; Danny Munson

The second day we had more road and instead of dirt we spent a lot of time on fire road. California has actually had a winter this year and as such there has been a fair amount of erosion from the rain. The fire roads have a mix of wash out, sand, ruts and hard pack. I rolled over all of these both up and down Black Canyon without any problem. As a group we had a few punctures during the three days but nothing crazy. The USH tires bit nicely into the corners descending and while I wasn’t letting rip too hard I was comfortable that they were not going to wash out on me. On the roll back to town I almost hit 40mph, a testament to the chevron pattern in the center of the tire that lets it roll fast on the road.

The final day I needed to top up the air pressure back to 75psi and there was a bit of slime spit. The surfaces were a bit of everything; some good old fashioned gravel, a nice big water splash; the perfect place to pinch flat, which I didn’t. Again fast road sections where I tucked in and almost hit 42mph, more mud, rutted double track and sand. Basically these tires handled everything I threw at them.

20170130_202453000_iOS

So in summary after 3 days and over 180 miles on mixed surfaces of all types these tires performed flawlessly. Conditions will change some in the coming months as things dry out but based on this experience I see no reason not to run them on race day. The security off road is worth the loss of any speed you may have when riding a pure road tire. The extra width gives a comfortable ride in all conditions and the added grip is always nice.

I’ll actually be using these at Rock Cobbler later this month too so if there are any major dramas I can report back on my experience.

I purchased these tires from Amazon for around $55 each, you can find them online at multiple retailers.

This Product was purchased by me. See previous gear reviews in the Reviews tab above. If you have a product you’d like reviewed, contact me at quadrathon@gmail.com

Tuesday, December 20, 2016

Review; Skills, Drills and Bellyaches. A Cyclocross Primer

In case you may have missed it I listen to podcasts. A 100 mile round trip commute gives you plenty of listening time! One of the podcasts I listen to is called CX Hairs (Cross-Hairs, get it!). I’ve listened to it for probably over a year or so, it’s good stuff especially if you’re into Cyclocross. Even if you’re not there are some good interviews and panel discussions. The producer of the show is a guy called Bill Schieken, Bill is all things Cyclocross. There is a great interview with him here. Beyond the podcast and his other online writing Bill is the author of a great CX book; Skills, Drills and Bellyaches; A Cyclocross Primer. I picked up a copy from Amazon a few months back just after completing the SoCal CX Skills clinic to fill in any gaps, and there were plenty, before race day.

The book is quick read at just over 100 pages and is broken down into two Sections; Skills and Race Day.

Skills; while there is a lot to be learned on the bike it’s important to have a solid understanding of the skills before developing and reinforcing bad habits. This book does a great job of breaking down the key elemental moves that a rider will face; dismounting, re- mounting, the race start, barriers, run ups, overtaking and so on. Each move is broken down into clearly defined steps. As you would expect the book is photo heavy with Jeremy Powers being the model on call. The photos capture the moves from multiple angles complete with a clear and easily understood narrative explaining each step. There is also a littering of “JPow Tips” from Jeremy. These give you some insider knowledge and come with years of insight.

Race Day; self-descriptive but this covers all things race day, some things you may have thought of, others you may have heard of and others will be completely new to you. It systematically goes through the processes of racing; the day before, the arrival at, the warm up, Race strategy, the Pits etc. There are also sections on Clothing and Tools. The clothing section I admit is more focussed on less warmer climates than southern California but it’s relevant stuff if you live somewhere where this is actual weather! More than a series of checklists each section is a catalyst for thought with an explanation behind it generated through years of experience. In the warmth of your bedroom they are out of context but when you packing, unpacking or climbing over the tape and about to start your practice recon lap their importance falls into place. Read them, think about them pre race and post race and modify to suit your needs. 

imageimage

I read the book in bed post clinic and pre-race. Without the context of a bike next to you some of these lessons seem sterile but when it’s Sunday morning and you’re riding your warm up lap they actually fell into place. They joy of the book is that you can refer back to it, which I have done several times.

The book quality is really good, it’s printed in landscape mode which makes the photography flow really well. Glossy durable pages will last a long time over multiple seasons and thumbings. Overall it is great go-to for anyone just starting, like me, or for anyone looking to improve their skills or remind themselves of everything they have forgotten after a summer off their cross bike.

As noted on the back cover what this book doesn’t contain is training plans, base miles or intervals. The skills and drills it contains may well be your cure for race day bellyaches! It’s a well-worn adage that you are either losing of gaining seconds on your competition per lap, it’s a no brainer where you want to be.

Skills, Drills and Bellyaches: A Cyclocross Primer from In The Crosshairs on Vimeo.

Don’t get caught short when you see those #crossiscoming hashtags or are you CrossCurious…is that even a thing? Either way this book is something that deserves some room on your bookshelf!

Available online at Bill’s own website or through Amazon the book retails for $21.99, it’s a tight squeeze but you might just get it in time for Christmas!

Wednesday, September 28, 2016

Review; Rocket Pure, Sunscreen, Balm, Friction Therapy & Shoe Deodorizer

So summer is behind us, well you know for Southern California! With the mercury hitting 100f last week September proved to be the usual toasty month that everyone kind of expects but hopes that won’t arrive!

The good folks over at Rocket Pure sent me a host of samples to try during the summer and now is the time to write them all up. I have to confess that I shared the box with Becca and so some of the comments are hers and are noted as such below. Additionally some things I haven’t gotten to yet either so I will have to circle back on those!

IMG_7652

From Rocket Pure’s website;

“At Rocket Pure, we believe that nature has it correct, so why add non-natural and harsh chemicals to products that go on our skin? Athletes want to take care of their bodies to keep them doing what they love best: moving. So why put something on your body that goes against all of this. That’s why we’ve created our products from nature, for natural athletes. You won’t find harsh toxins or chemicals in our products. That’s right, no:

  • Parabens
  • Sulphates
  • Synthetic Fragrances
  • Dyes
  • GMOs

In some of our products you will find preservatives. But some preservatives are ok, and here’s why:

All products are prone to bacteria growth, which would make our products ineffective. Fortunately there are preservatives derived from natural sources and so we use those in our products.”

So here is a summary of everything that we have put to the test over the preceding months

All Natural Sunscreen SPF30; the first thing I grabbed was the Sunscreen. Despite cultivating my tan lines Sunscreen is important! No this is not your usual rub on and forget to reapply and then burn. This stuff goes on and stays on and keeps working. I wore one application for up to 6 hours without any issues. I was warned that it was thick and it was not your “put some on for a walk to the coffeeshop” cream and it’s not. It lasts and leaves white zinc oxide schmear when applied. But it works!

Hand & Foot Balm; Becca grabbed this! She applied is post run and post shower. She applied it and wore socks, so as not to wipe it off on the carpet. It does a great job of moisturizing “dry, tough runner’s feet” her words and feet not mine! It smells nice; clean and lemony and herbal (not floral) and you done’t smell like food or shower cleaner!

Rugged Rescue Skin Balm; Becca went for this too and again used on her feet! Again post run and shower using the sock method. This defiantly made my feet feel “cool, almost soothing”. It wasn’t thick of greasy and was easily absorbed. A pleasant smell it’s a bit more rustic than the hand balm but doesn’t smell like furniture polish!

All Natural Chap Stick; once on this was great. The challenge was getting it on, it’s pretty thick and tended to crumble some. Felt really nice though, didn’t disappear in 30 minutes! No funny taste either. Probably really good for skiing or really windy or dry days when you are more exposed to the elements

Friction Therapy Anti Chafe Balm; I typically don’t use a chamois crème. On the whole I have no real need but I tried this several times. It goes on pretty thick but soon breaks down to an almost frictionless gel. Given where it goes you want this to be as issue less as possible and this did the exactly as described. It washed out pretty easily too. No nasty leftovers. It has a mild smell mostly from the Tea Tree oil.

Friction Terapy Anti Chafe Balm Stick; this was “wind up deodorant” stick type of the Balm. You apply it by rubbing in on the skin, as opposed to the Balm which is applied to the chamois. In a similar way it broke down into a frictionless gel and just did the job of not letting anything chafe!

Peppermint Shoe Deodorizer; I really wish I had this for when I was Ironman training, my Tri shoes were horrible and many is the time they had to sleep outside the night before race day! I had no worries about critters running off with them…they were pungent! Now my cycling shoes are a lot less so thanks to socks but after 5500 miles…yes I track mileage on my shoes they are not a bed of roses. I quick spritz of this did the job and my shoes smelt like they had been given a Tic-Tac each…minty fresh!

So that leaves the Cooling and Reviving foot and shoe powders to try! I’ll being writing those up in that in the coming weeks.

Definitely targeted at the athlete who training regimen is taking its toll on the body these go above and beyond your typical drug store options. They are the heavy hitters of prevention and recovery.

The products are available through their own online store or various other online outlets as well as selected store around the country. Things vary in price and start at $13.99 for the Rescue Balms. These are perfect little treats for yourself and would make great stocking stuffers for the upcoming holidays!

This Product was free of charge by the good folks at Rocket Pure. See previous gear reviews on the tab above. If you have a product you’d like reviewed, contact me at quadrathon@gmail.com.

Friday, September 23, 2016

Review; NeoCell Move Matrix & Collagen Sport

Recovery is important. Getting those calories into you asap after a big workout or race is important. You know that so I am not going to bore you with all the reasons why. For the far the past few months I have been using a different regimen for recovery and injury prevention. A combination of two products provided by NeoCell for review; Collagen Sport and Move Matrix.

IMG_7657

Both products contain and focus on the fact that they contain Collagen. From the web;

NeoCell - Move Matrix Advanced Joint Hydrator;

NeoCell Move Matrix Advanced Joint Hydrator provides scientifically advanced ingredients that work synergistically in the body to promote healthy joints. This premium formula supports joint flexibility, range of motion, and a healthy inflammatory response. Like all NeoCell products, Move Matrix is standardized to be bioactive for potent absorption and efficacy.

  • Bioactive neocell collagen type 2 - The key structural protein of joint cartilage. 60% of joint cartilage is made of collagen type 2.
  • Hyaluronic Acid - A water loving molecule that provides joint cushioning and lubrication, due to its ability to hold 1,000 times its weight in water.
  • Glucosamine, Chondrotin & MSM - A combination of building block nutrients that contribute to the formation of healthy connective tissue.
  • Move Matric Blend - A blend of antioxidants and herbal extracts that support a healthy inflammatory response in the joints.

NeoCell Collagen Sport;

The Rundown:

  • 15 grams Pure Ion-Exchange Whey Protein Isolate
  • 15 grams Super Collagen™ Bioavailable Peptides
  • Rich in BCAAs
  • Good source of L-Glutamine
  • Enhanced with Exogenous Amino Acids
  • Multi-vitamin Fortification

Doctor Formulated, What’s NOT in Collagen Sport™

  • Gluten, Wheat, Sugar & Lactose Free
  • No Artificial Sweeteners or Flavors
  • No Fillers or Synthetic Ingredients

For obvious reasons I can’t comment on the contents or ingredients and only really on my perception of the efficacy.

The Move Matrix tablets require that you have 5 a day, there is enough in the jar for 30 days. They not massive or particularly small. Easily washed down with a morning cup of coffee which is when I have been taken them. I found them easier to take with breakfast rather than on an empty stomach. Given that my training all year has been on the bike it has been very low impact, pretty much zero impact in fact. However it has been super repetitive. I am no spring chicken and anything I can do to be preventative in terms of avoiding injury is a good idea. My knees ache at time as do various other parts. I took these in the run up to my September Everesting and I have found that with the higher mileage weeks I could get train through them without any issues other than the general fatigue you would expect. I was definitely without niggling issues that I experienced last year during the height of my training.

The Recovery Sport drink was taken post ride. I was warned not to take everything at the same time as it probably wouldn’t sit very well. Mixed with a ½ and ½ or water and milk the chocolate mix is smooth and not overly sweet. Without wanting to sound like an advertisement for Swiss chocolate there was a rich silkiness to it that made it very drinkable. On very big days I added a scope of vanilla ice cream to it and that turned it into melted chocolate ice cream drink. Again from an efficacy standpoint having a recovery drink (or something) with 30 minutes of finishing a big workout is crucial in being able to recover and continue training and taking the Collagen Sport certainly allowed me to do that. I rarely take a rest day as from experience having an easy spin on the rest day allows me to come back at it pretty hard and taking the Collagen Sport certainly assisted me in doing this.

So overall both of these products were easy to take and I found them to work. There is no silver bullet when it comes to recovery or injury prevention and it’s usually a combination of several factors that combined allow you to avoid injury and consistently training at a higher amplitude. Taking both of these products certainly allowed me to do that.

Available online Recovery Sport retails for $30 for 15 servings so enough to last a month or so of heavy training. The Move Matrix is $20 for a 30 day supply.

This Product was free of charge by the good folks at NeoCell See previous gear reviews on the tab above. If you have a product you’d like reviewed, contact me at quadrathon@gmail.com.

Saturday, September 17, 2016

Review; Wind-Blox Pro

So the good folks at Wind Blox sent me over two packs of their Wind Blox Pro to try. I was keen to try them, as anyone knows on those long descents the wind whooshing in your ears often blocks out the sound of cars and other traffic coming up behind you. This can be especially disconcerting when it’s another cyclist who thinks he or she can descend like Vincenzo Nabali and swoops past you at 55mph when you’re doing your best to rail the apex of the corner doing 40+! Trust me it’s happened!

I received two packs of the Pro Version; one in Black and one in Silver. There are two versions; Pro which is 10cm long the Classic which is 6cm long. Length is driven by how long the strap is on the side of your face. Fitting them was easy enough. Velcro closures with the newer less scratchy small looped Velcro allows you to wrap them around the straps on your helmet. I had to lower the little plastic clasp that joins the straps that come from in front of and behind your ears. Some other wiggling was needed to get my sunglasses to sit comfortably. They felt noticeable against my skin when I thought about them, but other than that were pretty easily forgotten about. They were also pretty missable when you look at them, they sit close on your cheek underneath the strap so other than the small bulge and the text on the outside you would never know they where there. This makes them signifcantly less noticable than their competitors and don’t draw any real attention.

With them installed I took to the roads. It seemed best to head out on some hilly rides to maximize the potential for wind noise. I used the last couple of rides from the Santa Monica Challenge and for my Birthday ride.

image

These rides ranged in duration from 2:30 to just under 7:00 and had up to 7500’ of gain (and descent), plenty of wind in the ears.

image

The temperatures on the rides maxed out at in the mid 80s. I mention this as at this kind of temperature and when you’re sweating anything rubbing on your skin feels at best annoying and at worst will chafe!

I am unable to quantify the actual reduction and so I have to use qualitative interpretation. I think my expectation was a bit high as I was expecting there to be the “eye of the storm” with all the noise being reduced. Wind Blox claim up to a 80.2% reduction in wind noise. This combined with the impact of the “Hawthorne effect”; that is the behavior of something changes in response to it being observed may have skewed my interpretation. So while I do listen for traffic coming from behind I am more focused on the road ahead and while wearing these I was focussed on listening.

So with that all said the bottom line was that during the descents there was a decrease the overall whooshing air noise, this in turn makes them safer and that’s a good thing.

The reduction in noise make these an easy solution to a problem that all cyclists face. They are simple to fit and work. Simple and effective is always a good combination but something that so many products miss the mark on.  Add to that they cost less than $20 and it’s almost a no brainer!

Although it’s a bit early these are the perfect stocker stuffing for the upcoming Holidays!

This Product was free of charge by the good folks at Wind Blox. See previous gear reviews in the sidebar on the right. If you have a product you’d like reviewed, contact me at quadrathon@gmail.com.

Disclosure of Material Connection: I received Wind-Blox Pro for free from Wind-Blox Pro in consideration for a gear review.

Friday, August 19, 2016

Review; Wend Chain Wax Kit

I picked up some Wend Chain Wax a couple of weeks ago based on listening on an interview on the SoCal Cycling Podcast, if you haven’t subscribed to the podcast it’s a great show and I highly recommend it. I have had the opportunity to use it now for the last 10 days or so with roughly 300 miles use accumulation I thought it would be a good time to write up some thoughts.

Parafin Wax has been shown to have the least resistance of all lubes on a bicycle chain. But to apply wax to a chain is a time consuming and potentially complex process invlolving stripping your chain, cassette and cranks. This product makes it easy to apply a wax-based lube to the chain.

image

The very first thing I did before applying the wax was clean my drive train. There is no science to this it’s more a time and patience activity than a technical one. I use a Finish Line Chain Cleaner and Finish Line Citrus degreaser. I have tried several brands and I find this degreaser to be gentle but firm especially when cleaning a dirty cassette. I did remove the cassette from the wheel and stripped it down before reassembling it. Additionally I degreased both derailleurs. Basically I had a blank canvas on which to apply the Wax.

The Wax Kit comes in a neat box. Inside are the instructions, a bottle of liquid wax called Wax Off which is used to clean your chain and get liquid wax into the links of the chain and a stick of hard wax, called Wax On; Wax On is a sophisticated paraffin based Formula that includes proprietary friction reducers as well as proven lubricants such as Zinc and Teflon says Wend’s website.

Wax On is the same format as you have with a deodorant, you twist a barrel at the bottom and this lifts the wax clear of the container. There is a small micro fiber cloth for the application of the liquid wax. Oh and there are stickers…always a good thing. I purchased my kit from Amazon, it was the same price, $30, if I purchased from Wend directly but as I have Amazon Prime I saved on shipping. One thing I will say is that it has a super nice smell, somewhere between bubble gum and gummy bears! Much better than any chain lube I have smelt before.

Application was easy, here is a quick video from Wend showing you how to. The only thing I did differently was not to turn my bike upside down, because, you know, Rule #49!

With the liquid and the hard wax applied all that was left to do was ride. So I did! As mentioned I have put around 300 miles on since first using the Wax. In total I have applied it 3 times. I tended to apply it before my longer rides rather than every 100 miles. Longer rides recently have been in the 65-80 mile range.

IMG_6523IMG_6524IMG_6528IMG_6530IMG_6531IMG_6527

IMG_6532

Ready to roll…

So how does it perform? Well, actually really well. The obvious and important thing is the reduction in friction between the moving parts. Of course this is all perceived, none of this is scientific and I am unable to quantifiably measure differences. With that said the Wax is quieter, mostly. There is a tipping point when the wax needs to be reapplied and there is a fair amount of chattering from the chain if you go beyond that point. But to be perfectly honest, from my experience, that the same for any lube when it needs to be reapplied.

The most noticeable thing is that your drivetrain stays cleaner longer. While I am not riding in rain soaked gritty roads I do find myself riding on roads that wend (no pun intended) their way through lots of dry, sunbaked farmland and that ensures plenty of dirt and dust in the bike lane from the farm machinery, tractors, trucks and the like being thrown up on the bike. Typical lube would pick up this debris and liberally distribute it around the chain, cassette and chainrings. This results in less wear, longer lasting parts means more money saved and of course a cleaner drivetrain means less resistance and is an energy saver! 

In the pictures below you can see that there is still black chain lube residue on the cassette. I think this from where the chain was not 100% clean to start with. After a bit of research online it seems the best way to clean it is to break the chain and use a sonic cleaner with degreaser and water mix to really get into the crevices of the chain. Next time!                           

IMG_6552

image

image

After nearly 100 miles of use since the first application.

So in summary it has a big ticks in the main boxes…it reduces friction and it’s quiet! Additional ticks in boxes as follows;

  • Keeps you chainset cleaner than traditional lube!
  • Based on the three applications so far it one set of Wax will last a long time, I expect it to last a lot longer than a traditional bottle of lube
  • It smells nice…ok this is totally a bonus but smelling nice is never a bad thing!

As mentioned the set cost me $30 from Amazon, you can buy it directly from Wend or from a local bike shop that is distributing it.

This Wax Kit was purchased by me. See previous gear reviews in the Tab above. If you have a product you’d like reviewed, contact me at quadrathon@gmail.com.

Friday, August 12, 2016

Review; Voler Black Label DX

So the good folks at Voler sent me the latest iteration of their Black Label kit. I reviewed the original Black Label kit back in 2014 and one point of feedback in the review was that the jersey was a little loose on me. This time I requested the newer DX version which is slimmer fit and is described by Voler as “Aero/Tight”.

As I noted back in 2014 Black Label is a premium line that avoids the fanfare of team or sponsorship logos and is targeted against other brands where the cache is the brand/badge/logo of the manufacturers, think Castelli, Hincapie, Santini and the like. It’s a limited line in terms of items of clothing currently only offering bottoms; bibs and shorts, top; undershirts, jerseys, vest and jacket and thermal booties. New this year is the introduction of Woolen undershirts. It combines all the elements found in their proven team kits and serves them up in a highly functional and cosmetically simple but satisfying formula.

This year I am actually 7-8lbs lighter this year compared to 2014 (this morning I was 167.7lbs vs. 175 in 2014) so the slimmer fit would be a good choice. I am still 6’1” and so compared to my previous experience I ordered a size Large. All the photos below were taken with my Garmin VirbX.

Out of the bag both the jersey and bibs ooze quality. Soft and strong fabrics form the construction and they are both extremely lightweight.

FullSizeRender

The jersey. The jersey is constructed from multiple fabrics. There are distinct color coded DryTech panels on the side and at the base of your neck are made from a moisture wicking and heat dispersing fabric, this works very well in letting you cool off.  Despite the darker colors I had no issues with heat management.

The DX version has longer than average sleeves that sit closer to your elbows vs. the typical jersey sleeve which is more likely to sit mid bicep. The base of the sleeve in banded with PowerGrip, this is a silicon free fabric that holds the jersey in place.

FullSizeRender

At the back you have the customary three pockets and the added benefit from a small zippered pocket, ideal for a Credit card or cash and handy when reaching behind you grab a gel and don’t litter the road with all your valuables. There is some reflective trim on the back too. At the bottom there is a PowerGrip strip to stop the jersey from riding up etc. The pockets are plenty spacious and I had no issues filling them with all my usual goodies; bars, pump, phone, spares etc.

FullSizeRender

One new item which I really like is the light weight zipper on the front of the jersey which avoids zipper bulge when in a riding position.

The entire jersey is constructed with Flat Seams, crucial in avoiding chaffing.

The bibs; I have been wearing bibs for many years now, there really is no comparison to wearing shorts. The Black Label line up does offer shorts for folks who prefer them but for this review I opted for bibs. Similar to the jersey there is distinct feel of quality. It’s a seven panel construction and is highly compressive. The fabric is the Italian milled ForzaHC. This fabric offers a visually interesting dimpled look, it shimmers in the sun but is not shiney. As I opted for the red jersey the matching bibs came with a subtle splash of color on them that match the jersey.

FullSizeRender

Similar to the jersey the legs are finished on the inside with PowerGrip. These did a great job of holding the bibs in the right place and avoid them sliding up. The inseam on the large measures and is a little shorter than those found on Pactimo bibs which I usually wear. I had no issues with this other than the visual of seeing a little more leg than I am used to. The straps/braces are made from the same DryTech fabric as the bibs and are quick wicking.

FullSizeRenderThe most important part of any cycling bottoms is the chamois and Voler have stuck with the tried and true Cytech CompHP. Italian made, Cytech manufacture chamois for many cycling brands including Assos, De Marchi, DHB, Gore, Rapha, Spuik and many others. Designated as a pad that can be used for 6 hours plus I had no issues on my three test rides the longest of which was just under 5 hours. The best thing I can say about it was that I didn’t notice it. There is lots of technical information available here of you really want to get into it.

So as mentioned I rode it three times for test rides.

A 75 mile, 4500’ gain 4:47hrs ride.

image

A 54 mile, 5100’ gain 4:09hrs ride.

image

A 25 mile, 1400’ gain 1:27hrs ride.

image

So just over 150 miles, over 10,000’ of climbing and over 10 hours in the saddle. For each ride I had no issues and was comfortable for every mile and every foot gained. I even garnered a couple of complements at traffic lights from other cyclists. 

Overall much like the original I really like this kit. The understated non logo or overly patterned material is just timeless. The focus on quality is evident and the less is more look really appeals to me. The changes from the original; PowerGrip finishes and the lightweight zip on the jersey are great upgrades as is the use of PowerGrip on the bibs.

So if you’re looking for something that is full of quality and makes you noticeable without looking like a billboard or an explosion in a paint factory and want to save some $$ to actually be able to buy a espresso on those coffee shop rides this could be the kit for you.

There has been a slight price increase in two years and the bibs are now $149 and the Jersey is $119, the DX versions are $10 more than the non DX version.

Black Label is made in Grover Beach USA, in fact 99% of what Voler make is made in the USA. The name may sound French (it’s pronounced “Vol-lay”), and the style may err on the side of the Mediterranean but the elbow grease that goes into them is good old fashioned USA!

PS I paired the kit with a pair of SGX 8” socks from SockGuy which took my MatchyMatchy game to Level 11!

image

This Product was provided by Voler. See previous gear reviews in the Reviews tab above. If you have a product you’d like reviewed, contact me at quadrathon@gmail.com

Sunday, May 1, 2016

Review; Zinn & The Art of Road Bike Maintenance

So the good folks at VeloPress sent me the newest edition of Zinn and Art of Road Bike Maintenance. I am fortunate (or not?) to have simple road bikes. They are manual, not electronic shifting with mostly external cabling. My ability to maintain my own bikes have progressed from changing a tire to being able to set up my gearing. I have changed stems, bars and posts without issues. I haven’t quite gotten to a crankset change but I am sure my time will come! The only way to really learn these things is to dig in, some lessons that I have learned;

  • Be prepared for things to take 50% longer than you need
  • Make sure you have the right tools for the job in hand
  • Be patient
  • Saturday night may not be the best time to try something new or complex if your LBS is shut on Sunday!

IMG_6163

So with that said on with the review, from the publishers;

Lennard Zinn, the world's leading expert on bicycle maintenance and repair, has released the new fifth edition of his best-selling guide Zinn & the Art of Road Bike Maintenance. Offering simple step-by-step instructions to vintage components as well as the newest shifting, braking, cyclocross, forks, and bottom bracket systems, Zinn's fifth edition is the most complete resource for DIY bike service. Zinn & the Art of Road Bike Maintenance is the world's best-selling guide to bicycle repair and maintenance. From basic repairs like how to fix a flat tire to advanced overhauls of drivetrains and brakes, Lennard Zinn's clearly illustrated guide makes every bicycle repair and maintenance job easy for everyone.

Zinn's friendly step-by-step guide explains the tools you'll need and how to know you've done the job right. The book's two-color interior is easy to read-even in a dimly-lit garage or workshop. Hundreds of hand-drawn illustrations and exploded parts diagrams show just the right level of detail to lead you through every bicycle repair task. What's New in Zinn & the Art of Road Bike Maintenance, 5th Ed.:

  • New tech covered in depth: through-axle forks,  SRAM eTap wireless shifting, second generation Shimano and Campagnolo electronic shifting, direct-mount sidepull brakes, SRAM X-Sync 1x11 cyclocross systems, tubular tire gluing tapes.
  • New chapter on electronic shifting covers maintenance, service, repair, and troubleshooting of all Shimano, SRAM, and
    Campagnolo electronic shifting groups.
  • New chapter on disc brakes covers maintenance, service, and repair of all hydraulic and mechanical systems.
  • New troubleshooting charts
  • New master guide to press-fit bottom brackets

Also covered in the 5th edition: All derailleur shifting systems (5-speed through 11-speed); all bottom bracket systems (cone-and-cup through press-fit); all brake systems (including caliper, V-brake, cantilever, and disc); all headset, stem, handlebar and fork systems; wheelbuilding for all bikes including cyclocross and disc-brake wheels; special sections on cyclocross throughout including troubleshooting, maintenance, service, repair, and equipment selection; updated and expanded torque tables; complete illustration index and complete subject index.

Lennard Zinn is the world's leading expert on bike maintenance and repair. He is a world-renowned bicycle technician, frame builder, and tech writer for VELO magazine and VeloNews.com. Zinn was a member of the U.S. national racing team and has been riding and fixing bikes for nearly 50 years. A professional frame builder for his business Zinn Cycles, Lennard hosts the popular bike tech Q&A column on VeloNews.com.

As with anything the proof is in the pudding. My recent crash at Strada Rosso prompted me to sit down and actually figure out how to dial in my SRAM chainset. SRAM was new to me as all my bikes have Shimano but while the pieces are in different places the principles were the same. I pulled the book off the shelf sat down and read it. Then with the book in hand I approached the bike. 20 minutes I was set, Rear Derailleur mastered. My only reference point was the book! Mission accomplished!

image

The book is broken down into 17 key areas these range from emergency Repairs to specific areas of the bike i.e. Forks or Pedals. Within each section there are sub sections which relate to the specific items in hand, in my case above I started with Section 5 cable actuated Shifting Systems then 5.3 Adjustment of Rear Derailleur and Right Hand Shifting…slow down and read the manual! Seriously easy! Each Chapter lists the tools I need and each major task has a Complexity level. This way you won’t find yourself in the deep end with no tools and an anvil tied around your ankle! There are plenty of hand drawn illustrations and a picture is always worth a 1000 words, many of which have exploded views. Personally I find these easy to understand than photographs which can be confusing.

Available everywhere, the MSRP is $26.95 I am sure this will drop in a few months.

This is definitely a book you need to have on your bookshelf and for the price of a couple of inner-tubes you can!

This Product was provided by VeloPress. See previous gear reviews in the Reviews tab above. If you have a product you’d like reviewed, contact me at quadrathon@gmail.com

Saturday, February 20, 2016

Review; Saucony Triumph ISO 2

With everything being about the bike there has been a little time for running. That said I have been able to accumulate a few miles. I was incentivized by the lure of fresh smelling shoes thanks to the good folks at Saucony. They sent me the latest iteration of their Triumph ISO 2 shoe. I reviewed the original shoe just under a year ago and you can read that review here.

The big update on this shoe versus the original version is the inclusion on their proprietary technology Everun. Rather than let me try to explain it here is a little video from Saucony.

  In addition to Everrun the new features include:

  • IBR+ (Injection Blown Rubber) this is lighter and more environmentally friendly than previous versions.
  • IsoFit; Internally the shoe retains the IsoFit inner sleeve that encases your foot, the lace cage has been redesigned and is much improved over the prior version.
  • Tri-Flex provides better ground contact and push off which adds to efficiency and effectiveness of your ground contact.
  • There is an 8mm heel drop so this is not a minimal drop shoe.

imageimage

Saucony describe this shoe and Plush cushioning Neutral Shoe designed for neutral pronation.

So how does all this technology feel?

Well it’s like running on firm marshmallows. Actually that is probably the best description I can give you. Structurally the shoe is very supportive, the neutral design does not force your foot in any direction.

Weight wise they 10.2oz so they are 3oz heavier than my usual Kinvara’s but it’s not really noticeable. The Everun cushioning is very effective and providing positive rebound and is not spongy it adds a bit of a pop to your run.

Along with the above changes the heel cup has been redesiged to to provide a more skelatal structure rather than simply plastering the shoe in plastic support, this also reduces weight. Overall the weight has increased just over an ounce vs the prior version.

The Everun technology is also designed to add life to the shoe, my original Triumphs died with around 270 miles on them so I am hoping that these will exceed 300 miles in long run.

Overall the fit is similar to the original Triumph ISO shoe, the only main difference is that they are coming up a little smaller than before. This smallness is noticable in the length. I usually size up half a size but I should have gone a full size this time. I would imagine that this will become more noticeable over time as your feet heat and expand. For me as running is a cross training activity it’s not a major issue however for someone marathon training this could become a problematic.

The shoe has been acknowledged Runner’s World Editor’s Choice for the Triumph ISO 2, this continues this award as it won it last year too!

IMG_2083IMG_2085IMG_2084

Overall this is a well-constructed solid running shoe. The new technology provides for a comfortable ride and as long as you take into account the sizing issue you should be good to go. With the added durability this could very easily become the go to shoe for most runners

Available in three different colors for mens and womens and also in wide versions too. You can find these shoes in reputable Running Stores and direct from Saucony online for $150 where uyou can also read a growing list of user reviews.

These shoes were provided free of charge by the good folks at Saucony. See previous gear reviews in the sidebar on the right. If you have a product you’d like reviewed, contact me at quadrathon@gmail.com.
Friday, January 29, 2016

Review; Vittoria Pro Trainer Tire

It’s probably no surprise that I ride my Trainer a lot, at least 4-5 sessions a week are indoors. I used to use my regular wheel with a regular tire on it. Obviously this wore out the rear tire a lot faster than front. When I flatted, in fact I shredded my tire last year I switched over to a trainer tire.

I did a bit of research and in the end settled on a Vittoria Pro Trainer Tire. My research was not overly detailed and was driven by cost and color! Of course red was a no brainer and the fact the 700x23 tire was less than $30 from Amazon went a long way to making up my mind! That said the reviews on Amazon and other places were very favorable and covered durability, overall use and cost.

imageimage

This was back in September. Since then I have put on 2000 miles on it. 99.999% of these miles were on my Kurt Kinetic Road Machine and the remainder on the recently sold Tacx Bushido.

image

The tire shows little wear and is not even close to wearing down the raised rails that run around the outside. Other key features I have noticed:

  • Gone is the light dusting of rubber over everything behind me
  • No squeak on the trainer roller
  • No slip on the trainer roller

image

I am tracking my mileage on it and will report back on when it finally dies. Right now that looks to be a long way out in the future!

In the meantime if you are interested you can pick one up from Amazon they’re available for $28.00.

This Tire was purcased by me! See previous gear reviews in the tab above. If you have a product you’d like reviewed, contact me at quadrathon@gmail.com.